Making Textile Cards
 |
| My Favorite for Spring |
Looking for some new cards for spring? I have a new selection at Creston Card and Stationery, in Creston, BC. You can always contact me if you want something specific.
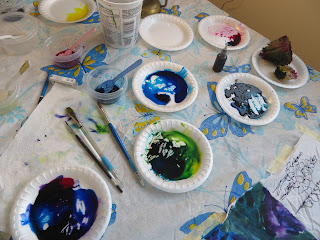
Do you want to make some textile cards yourself? Below you will see the start of the process. Click here or Click here for two other posts about the process of painting with dyes.
Here the painted dye is wet. I am painting on soda ash soaked cotton which reacts with the dyes so their bond becomes permanent with the fabric.
Sometimes I put the thickened black dye in a bottle with a nib and draw the image first. You can see the bottle in the upper right corner of the photo below.
Oh the excitement of applying the thickened dye to fabric. I find it easiest to work on few card tops at once. That way if I am mixing the red dye I can apply it to several sections while I have some mixed up. You have to work fairly quickly as the setting of the dye relies on moisture so you don't want the fabric drying out. After the dye is applied I then put the fabric in between two pieces of plastic to cure 24-48 hours at 70 degrees F or above.
A length of fabric that has been rinsed, washed twice with Synthrapol which is a detergent that helps keep excess dye from moving to other areas and staining it. I like to iron the pieces dry. Mostly because I can't wait to see how they've turned out!
Another piece of cotton was painted with dyes in a way that may suggest landscapes. I like to use up the little bits of mixed dye colours that I have left over when painting the specific images such as in the photo above this one. Let your imagination run wild.
A window cut out of card stock can be used to choose the composition.
Heavy interfacing is ironed on the back of the fabric where I will be cutting the card top. I use 4" X 6".
Here is a sample of a length of cloth with the interfacing on, now ready for cutting out the card tops. Did you note that two of the corners are lacking an interfacing backing? They didn't make the grade and were culled out. On one the black dye bled into the yellow of the butterfly. This happened as I was too impatient to let the black cure overnight before adding the yellow dye. I managed to get away with it on the larger butterflies as I stayed away from the black line as much as possible. Reminder to self, plan to sketch out images with black dye and cure overnight!!!
This one turned out much better and with additional free motion stitching it should be a card that someone will like as it reminds them of spring. I was quite please with the sky in this one. It was a very light mix of blue, having a lot of the thickener (sodium alginate) in it. I sponged it on. It reminds me of those breezy days in May and June.


4 comments:
While this is obviously a labour-intensive process, the results are truly outstanding. Your cards a pure delight, and make a gift of themselves! Beautiful work, Eileen...
Enjoyed the refresher course and the wonderful spring colours!
Wow - so labour intensive but your cards are always so interesting, it makes the labour worthwhile. Super work Eileen.
Love the image of all that colorful fabric stretched out across your table. Lovely.
Post a Comment